Guides
Install iManager in the user interface
Used to quickly deploy iManager in a Kubernetes environment through the installation wizard provided by SuperMap iManager Deployment Center.
Installation
Notes:
- If you have installed SuperMap iManager through the deployment center before and need a new iManager environment, please first click Uninstall in the deployment center->deployment interface and then reinstall.
Your last configuration options will be retained when you install again, so that you can quickly complete the corresponding configuration.
- If the license center has been deployed in the environment you are using, the account password must be consistent with the last time, please set it carefully! If the business needs to modify the license center account password for the second time, please uninstall the deployed iManager first, clear the /opt/bslicense/data directory on the kubernetes node, redeploy iManager, complete the setting of the license center account password during the deployment process, and go to the license center to re-import the license file after the deployment is completed.
- Start SuperMap iManager Deployment Center and access it, enter the Deployment interface, and click Getting Started.
- Select Product, select SuperMap iManager for Kubernetes, and click the Next button.
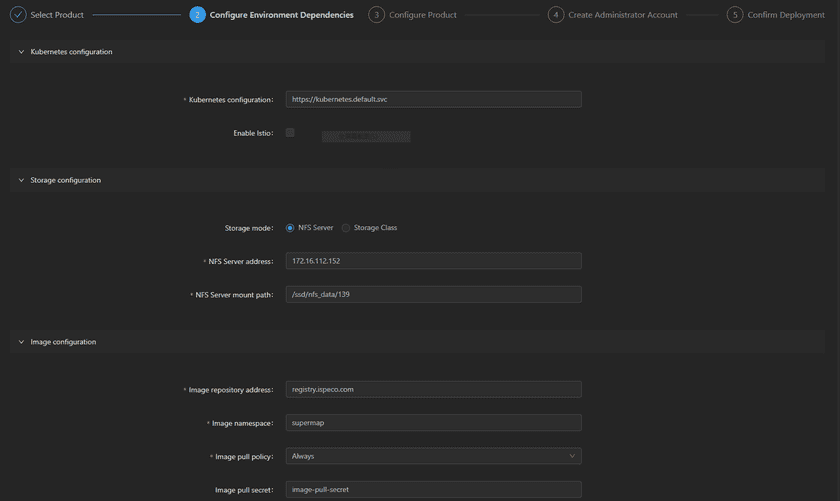
- Configure Environment Dependencies,Basic configuration items include Kubernetes configuration, storage configuration, and image configuration. You can fill in or modify the default values as needed. In the advanced options, you can configure Kubernetes node affinityandtolerance to control how Pods are scheduled in the cluster to meet your resource requirements and operating constraints. After the configuration is completed, click the Next button.
3.1 Basic configuration
-
Kubernetes configuration:You can configure the URL address of the K8s Master node and Enable/Disable the service mesh.
Kubernetes Server address defaults to
https://kubernetes.default.svc. Usually, you can keep the default value. If the K8s environment is provided by a public cloud such as Alibaba Cloud, you need to fill in the URL of the actual K8s master node. You can use the command “kubectl cluster-info” to view the K8s cluster information. For example,https://192.168.17.110:6443。 -
Storage configuration: Provides two methods: NFS Server and StorageClass to store iManager data.
- NFS Server:You need to install NFS Client in the Node machine of K8s. NFS Server address Fill in your NFS Server address, which can be either IP or domain name. NFS Server mount path is the root path (/) by default . Please fill in the path according to your NFS installation. If you use the NFS offline installation package provided by SuperMap Install NFS, the address here is: /opt/nfs_data.
- StorageClass:Supports filling in the StorageClass name corresponding to Ceph storage or Longhorn storage.
-
Image configuration: You can fill in the configuration related to the iManager image repository to pull the image required for deploying iManager.
Image repository address is the Alibaba Cloud warehouse
registry.cn-beijing.aliyuncs.comby defaults, which is recommended when using the Internet; if you use the intranet, the warehouse is configured as<ip>:5000,<ip>is the IP address of the machine where the image repository is located.Image namespace defaults to supermap, but can also be customized.
Image pull policy provides three modes: IfNotPresent, Always, Never, which respectively mean “if there is an available image locally, use the local image, otherwise pull it from the image repository”, “always pull the latest image from the image repository”, and “do not pull the image from the image repository”. IfNotPresent is selected by default. Imange pull secret is used for identity authentication when pulling private images. You can fill in image-pull-secret. If you configure a private repository, please refer to FAQ(Tutorial -> Appendix -> FAQ -> Question 6)。
3.2 Advanced Options
-
Node affinity configuration: You can configure node scheduling modes separately under Required scheduling and Preferred scheduling.
Requered ensures that Pods must be scheduled on nodes that satisfy the node affinity rules. In label settings, you can set label keys, operators, and label values. Operators can be selected as “In” (the value of the matching label key must be one of the provided list), “NotIn” (the value of the matching label key cannot be any of the provided list), “Exists” (the matching label key must exist regardless of its value), “DoesNotExist” (the matching label key must not exist), “Gt” (the value of the matching label key must be greater than the provided value), or “Lt” (the value of the matching label key must be less than the provided value). In addition, you can add new labels.
Preferredallows Pods to be scheduled while meeting node affinity rules as much as possible, but not necessarily. You can set label keys, operators, label values, and weights. You can configure multiple label values separated by ”;“. In addition, you can add new labels and add multiple sets of preference settings.
-
Node roleration configuration: By setting the node’s toleration, Pods can be scheduled on nodes with specific taints.
You can set the label key, operator, label value, and policy. For the operator, you can choose “Equal” or “Exists”, and for the policy, you can choose “NoSchedule”, “PreferNoSchedule”, or “NoExecute”. In addition, you can add new labels.
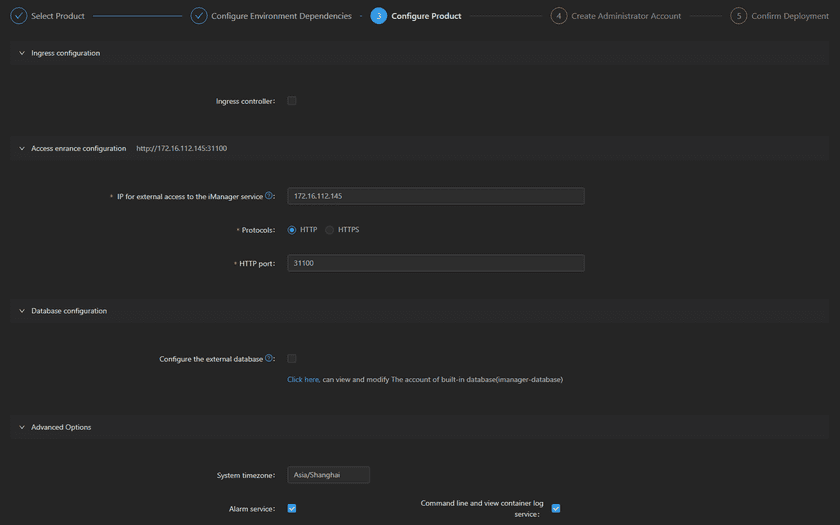
- Configure Product,The basic configuration items include Ingress configuration, access entrance configuration, and database configuration. You can fill in or modify the default values as needed according to the actual situation. In the advanced options, you can choose to enable/disable a variety of built-in service capabilities according to your needs, including: geometry service, file manager, system monitoring service, log harvesting service, iPortal-related services, etc., and support the configuration of external licensing center, RabbitMQ, Keycloak and other services. After the configuration is completed, click the Next button.
4.1 Basic configuration
- Ingress configuration: After using the Ingress controller, you can set the domain name. It will provide two service types: ClusterIP and LoadBalancer. ClusterIP is selected by default. If the K8s environment is provided by a public cloud such as Alibaba Cloud, select LoadBalancer. Domain mapped Kubernetes node IP is required if you choose the ClusterIP type or need to configure the access entry domain name. It is optional when you choose the LoadBalancer type. The first K8s node IP is used by default.
- Access entrance configuration:You can use the domain name only after enabling the Ingress controller. You can modify the IP for external access to the iManager service on demand. It is recommended to fill in the K8s Master node IP (or proxy IP)/cloud vendor elastic public network IP. You can also specify the HTTP or HTTPS access protocol and configure its external port, etc. For details, please refer to Basic Service Management(Tutorial -> Basic Services -> Service Management -> “Configuration”)。
- Database configuration: You can enable Configure the external database. If not enabled, the PostgreSQL database provided by the system will be used by default.
4.2 Advanced Options
- System timezone: The relative path of the time zone file in the system time zone directory (/usr/share/zoneinfo/). Usually the default value is Asia/Shanghai. You can modify it as needed, for example: America/New_York
You can choose whether to enable Alarm service, Command line and view container log service, System monitoring service (Prometheus), Log harvesting service as needed. Among them, the system monitoring service and log harvesting service provide multiple sub-function services, and you can select and configure external services as needed.
If the license center, message notification, gateway Redis, user center Keycloak and its database need to be configured as external services, you can enable Configure external Bslicense service, Configure the external RabbitMQ service (RabbitMQ), Configure the external Redis service, Configure the external Keycloak service and Configure the external Keycloak database as needed. When configuring, please fill in the accurate host name, port, account password and other information of the external service.
- Create Administrator Account, After filling in the administrator username and password, click the Next button.
- Confirm Deployment, Before the system is officially deployed, you can return to the previous steps to confirm or modify the information again, and then click the one-click deployment button after confirmation.
During the system deployment process, you can use the progress bar to understand the real-time deployment status. The final deployment result may include some service startup failures and deployment failures:
- Deployment is successful but some services fail to start: The “Deployment” interface will remind you to pay attention in time. You can find the corresponding service under the “Basic Services” list in the iManager interface and try to redeploy.
- Deployment failure: You can choose Uninstall and reinstall or go to the previous configuration step Return to modify, reconfigure and try to deploy again.
View deployment information
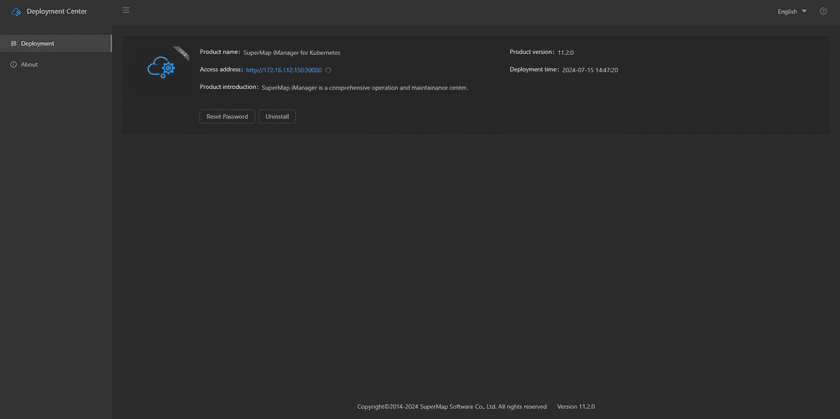
After SuperMap iManager is installed, you can view the product name, product introduction, product version, deployment time, and access address in the Deployment Center->Deployment interface. Click “Access address” to jump to the iManager login interface. You can also uninstall the currently deployed iManager with one click.
Go to Deployment Center->About page, and you can also learn about the version of the deployed iManager and other information.
Notes:
- If you forget the administrator password, you can reset it.
- If the configured access portal cannot be accessed due to reasons such as the internal and external network environment, you can reset the access portal. The reset access portal will adopt the form of “IP+port” and can be modified in the iManager portal configuration later.
- After the SuperMap iManager is deployed, it is recommended that you disable the deployment center. For the deactivation/enabling method, see Deployment Center->Disable/Enable Deployment Center.
Configure licensing
After the installation is complete, you need to import the license before you can use it. Here we take the import of the trial license as an example.
First, go to the SuperMap official website to apply for a trial license or purchase a formal license.
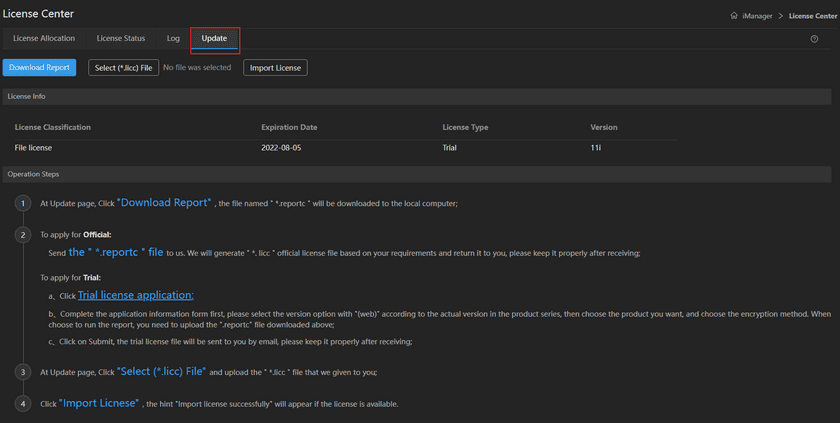
Visit the iManager page. If there is no license, it will automatically go to the License Center (Web version) page. Click Activate Update and import the license according to the operation process.
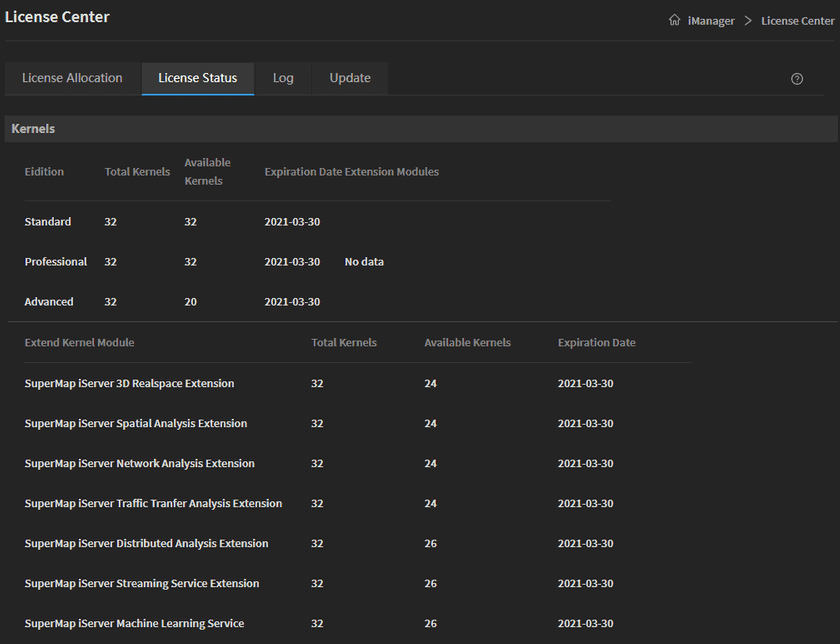
After the import is successful, you can see the license information in License Status tab.
Now you can use iManager normally.
