Tutorial
GIS Cloud Suite Management
SuperMap iManager supports to manage GIS Cloud Suite. Users can check the site’s account information, add services, reallocate the site resources, delete/redeploy the existing sites, search the services by keywords, enter and use GIS Cloud Suite through the site. Users can also view the service/container logs, redeploy the services/containers, adjust the specs of service, stop/start the services, modify the images of service, expose/hide the services address, scaling the services, edit the YAML file of services, and control the containers’ command pad.
The following content is going to introduce GIS Cloud Suite management in two aspects: service and container.
Service Management
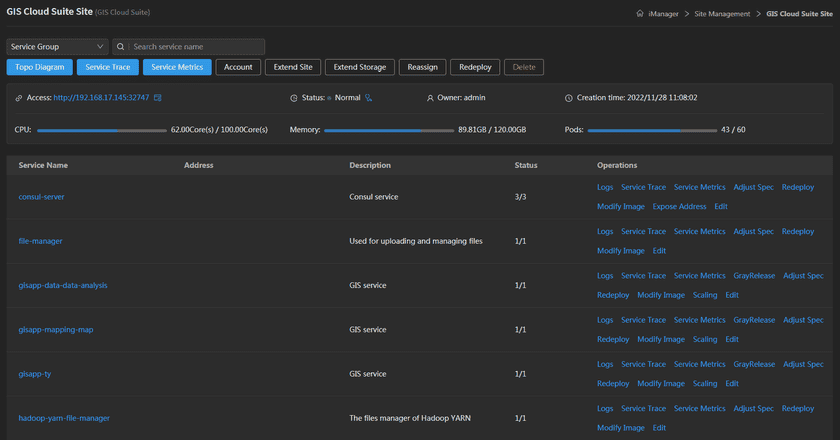
On the GIS Cloud Suite page, the page has the information of site name, access address, status, owner, creation time, and services list. Please manage GIS Cloud Suite sites by the following functions:
- Service Group: Filter the services by service type, support to select multiple types of service.
- Search: Search the services in the service list by key words.
- Topo Diagram: View the associations between the services in the site, more introductions please refer to Sites Management > GIS Cloud Suite > GIS Cloud Suite Monitoring.
- Service Trace/Service Metrics: Please refer to GIS Cloud Suite Monitoring.
- Account: Clicks to view the site’s username and password.
- Extend Site: Clicks to upload YAML file, and add services to GIS Cloud Suite.
-
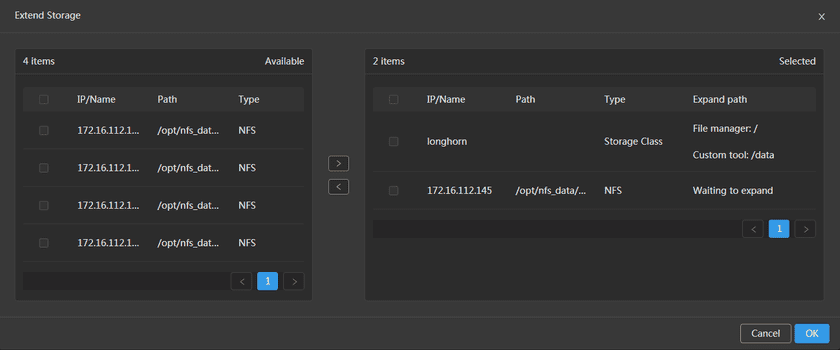
Extend Storage: Append a storage environment to the current GIS Cloud Suite site. When the site has been bound to the storage disk is not enough through this function for the site to extend other storage(Need to add in the storage management first). After the extension, the system will create a new directory (The “Expand path”), and the user needs to upload the new data to the directory to use the new storage environment.
For example, as shown in the figure below, the site’s default mounted storage will be automatically displayed on the right Selected area. Moves the NFS storage with the IP “172.16.112.145” and the mount path “/opt/nfs_data/145” to the Selected area, and confirm that the extension is effective and the newly added storage cannot be deleted.
Notes:
- Relevant services will restart after extending storage.
- It also supports to extend storage for GIS Server, GIS Desktop, GIS Tiling Cluster, GIS Site, GIS Big Data, Geo-Blockchain and other environments.
- Extend storage function is only available to the system administrator role.
- Reassign: Reallocate the maximum available CPU and Memory of the site.
- Redeploy: ‘One-click’ to redeploy GIS Cloud Suite site.
- Delete: Delete the existing GIS Cloud Suite site.
- Access: Clicks on the link of the address to enter and use GIS Cloud Suite. Deploy function is also provided at the Access.
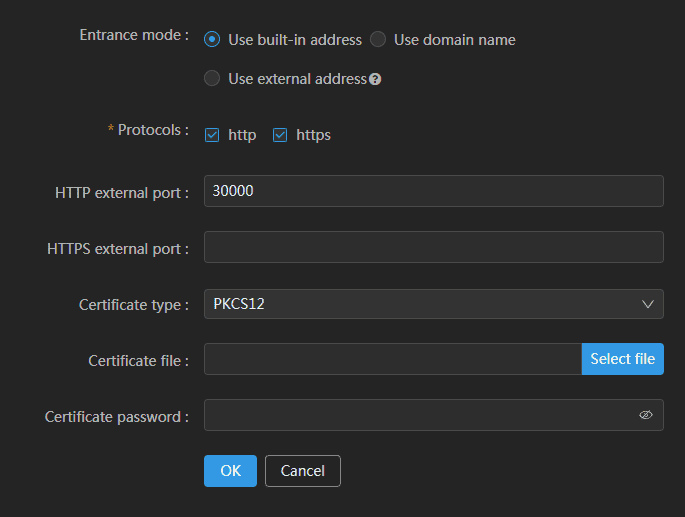
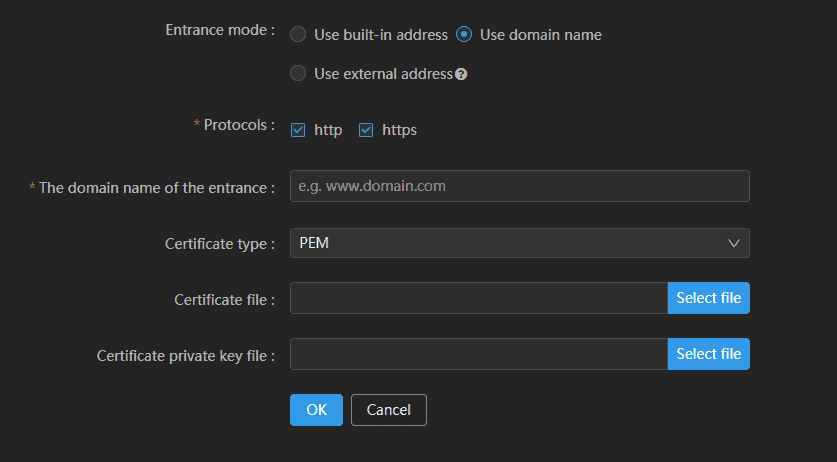
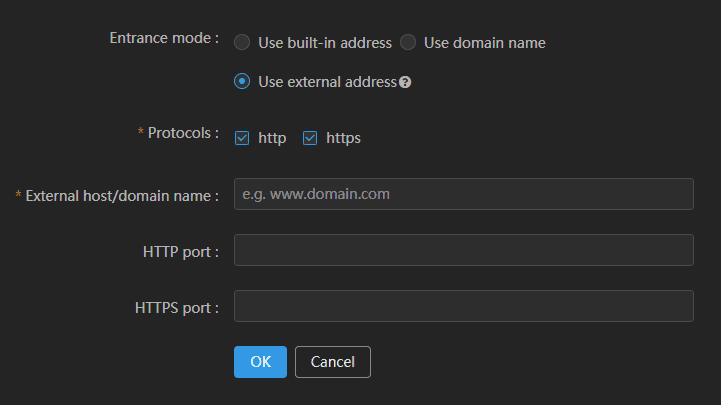
- Deploy: Access entrance configurations. ‘One-click’ to switch address or protocol for access entrance, and supports enabling multiple protocols at the same time. GIS Cloud Suite’s services will be interrupted for a short time while the access configuration is being modified.
-
Entrance mode: Configuration mode for the access entrance of GIS Cloud Suite(Single selection).
- Use built-in address: Checks to enter GIS Cloud Suite when using a built-in url.
- Use domain name: Checks to enter GIS Cloud Suite when using a domain name.
- Use external address: Checks to act as a proxy for GIS Cloud Suite when using a reverse proxy server.
-
Protocols: Protocols for the access entrance of GIS Cloud Suite(Supports multi-selection).
- http: Checks to configure protocol when the HTTP protocol is required.
- https: Checks to configure protocol when the HTTPS protocol is required.
- The domain name of the entrance: Configures domain name of the access entrance of GIS Cloud Suite.
- External host/domain name: Proxy address with host/domain name to enter GIS Cloud Suite via a proxy server. It is required when selecting the option Use external address.
- HTTP (external) port: The port of the service that enables the HTTP protocol externally required to access the GIS Cloud Suite. This configuration item is not available if the configuration scenario chooses to use the ingress domain name.
- HTTPS (external) port: The port of the service that enables the HTTPS protocol externally required to access the GIS Cloud Suite. This configuration item is not available if the configuration scenario chooses to use the ingress domain name.
-
Certificate type: When the option Use external address is not selected and HTTPS protocol is enabled, the user selects the certificate format according to the local certificates, including PEM(Privacy Enhanced Mail) format, PKCS12(Public Key Cryptography Standards #12) format, and JKS(Java Key Storage) format. If the domain name of the entrance is enabled, the certificate type can only choose PEM format.
- PEM: A very common container format for digital certificates and keys that is used by Apache and other web server platforms. It is usually in text format, which can save certificate and private key.
- PKCS12: An encryption standard for exchanging digital certificates to describe personally identifiable information.
- JKS: A keystore file generated with Java Keytool tool.
- Certificate file: Certificate public key. Uploads local certificate file. When the certificate type is a JKS or PKCS12 format, you can upload a certificate file with .keystore as the suffix. When the certificate type is a PEM format, please upload a certificate file with .crt as the suffix.
- Certificate password/Certificate private key file: Certificate private key. When the certificate type is a JKS or PKCS12 format, enter the configuration certificate key. When the certificate type is a PEM format, please upload the local private key file with .key as the suffix.
Notes:
If you choose to use an external address and use the Nginx reverse proxy, you need to configure the Nginx listening port (listen), the external host or domain name to be accessed (server_name) in the default.conf file, and configure the related configuration under location. Please refer to the following example for the details:
     location / {
         proxy_pass https://172.16.112.150:30178;   # Proxy GIS Cloud Suite Address
         proxy_set_header Host $http_host;
         proxy_set_header X-Forwarded-Port $server_port;
         proxy_set_header X-Forwarded-Proto $scheme;
         proxy_set_header X-Forwarded-For $proxy_add_x_forwarded_for;
         proxy_redirect http:// $scheme://;
}- Status: The current state of the site. Diagnose function is also provided at the Status.
- Diagnose: Clicks on the icon to perform diagnose and repair operations when GIS Cloud Suite site status is abnormal. 1. It currently supports to diagnose the failure that unable to connect to Keycloak-postgreSQL. 2. To perform the repair, it will clear the users, roles, security configuration, and authorization information. You need to re-add and authorize after the repair.
- Owner: The name of the account that created the site.
- Creation Time: The time that the site was created.
- CPU: Shows the used CPU and total CPU of the site.
- Memory: Shows the used Memory and total Memory of the site.
- Pods: Shows the number of running pods and the maximum number of pods in the site. Pod is the minimum running unit in Kubernetes, a pod can be made up by multiple containers, the pod provides service ability.
The services list lists all the services running in the site, manage the services by the following functions:
- Service Name: The name of the service, click on the link of the name to enter the containers detail page to manage the containers(please refer to Container Managememt).
- Address: The address of the service, users can access the client of service by the address link.
- Description: Explains the funtion of the service.
- Status: Shows the number of running/total replicas in the service.
- Log: Clicks to view the operation log of the service.
- Service Trace/Service Metrics: Please refer to GIS Cloud Suite Monitoring.
-
Gray Release: Traffic is split amongst two or more completely different versions of a webpage. The services that support gray release include: ispeco-dashboard-ui, ispeco-dashboard-api, and gisapp.
- Service: The name of the aimed service.
- Version: Fills in the name of the new version.
-
Gray release strategy(Based on traffic ratio): To realize gray release by setting the traffic ratio of users.
- Traffic ratio: Set the percentage of new version users. For example, if the traffic ratio is 30, that is 30% of users are going to use the new version, 70% of the users are going to use original version.
-
Gray release strategy(Based on request content): To realize gray release by setting request header and header value. Fills in the request header and header value when sending request, to control the version.
- Header/Header value: Set the request header and header value, the header value supports regular expression.
- Add header: Add header and header value. If you add header, the request content should have multiple headers and header values. That is, if you set three set of headers, the request must include all three set of headers.
After setting gray release, the system will create a new service, you need to specify the new version’s image by Modify Image function. What is more, you can do the following operations:
- OffLine: Delete the version.
- Modify GrayRelease: Edit the strategy of gray release.
Please refer to Tech Docs > Best Practice > Gray Release for a complete example of gray release.
- Adjust Spec: Adjusts the service’s CPU and Memory spec.
- Redeploy: Redeploys the service.
-
Modify Image: Change the image name, image pull policy, and image pull secret of the service, this function can be used for rolling upgrade.
- Image name: The name of the image that the service used. The format is: Registry/Namespace/Imagename:tag.
- Image pull policy: The policy that stipulate how the service pull image from registry. There are three kinds of policies, they are Always(always pull the latest images from registry), IfNotPresent(Use local images first. If local images are unavailable, pull the images from registry), and Never(Use local images and nerver pull the images from registry), you can select one of these policies by the requirement.
- Image pull secret: The secret of namespace. The namespace does not have a secret by default, user need to create the secret. After creating the secret, it is necessary to configure the secret, otherwise the images can not be pulled. Please refer Appendix > FAQ > Question 6 to create secret.
- Account: Clicks to view the account’s username and password.
- Stop/Start: Clicks to stop/start the service, reduces the useage of system resource. The services do not support to stop if the icon is not existing.
-
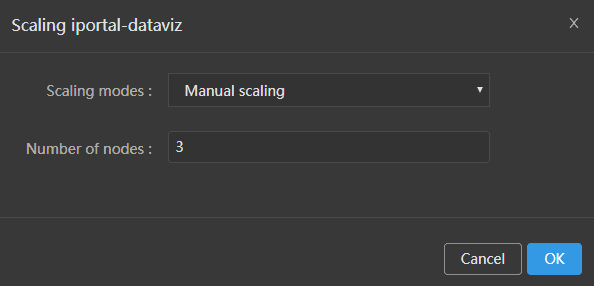
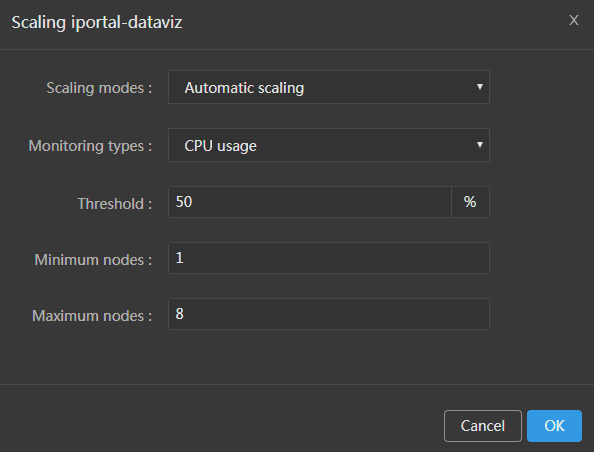
Scaling: Extends the service.
- Manual Scaling: Set the number of nodes, the system would scaling the nodes to the expected number.
- Automatic Scaling: Set the monitoring type, threshold, minimum node(s), and maximum nodes, the system would automatically scaling the nodes according to the loads. The automatic scaling could be deleted by clicking on the button beside the service name.
- Expose Address: Exposes the service access address.
- Edit: Edit the YAML file of the service.
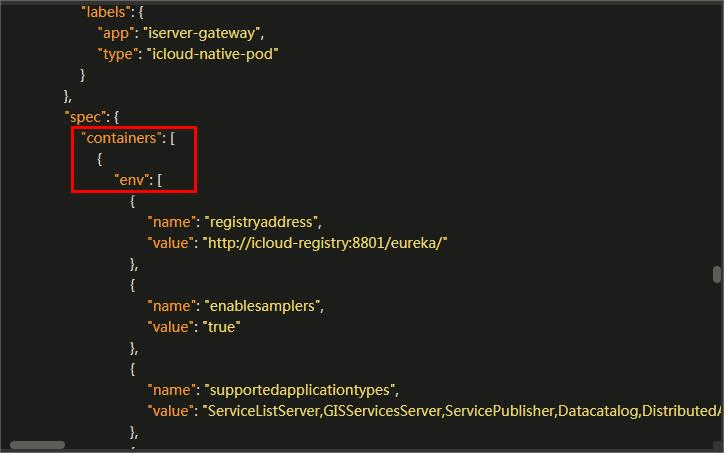
If the gateway needs to enable HTTP cache, perform the edit on the “iserver-gateway” service node.
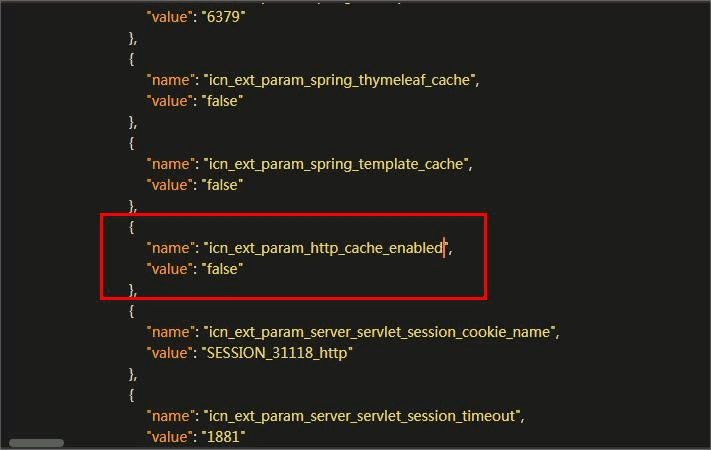
Navigate to the environment variable, as shown in the figure below.
Add an environment variable named “icn_ext_param_http_cache_enabled” and set the value as required. Setting false as shown in the figure below means turning off the gateway cache, while setting it to true means turning on the gateway cache.
Finally, click OK, and it will take effect after restarting.
If you add services, the new added services will be listed below the service list. The added services are listing by the kind of resources in YAML file. Please manage the added services by the following functions(here we are using MySQL service as an example):
- Name: The name of resource in YAML file.
- Type: The kind of resource in YAML file.
- Description: The description of resource in YAML file.
- Information: ‘Deployment’ and ‘StatefulSet’ resources show the running/total replicas; ‘Service’ resource shows the information of port; ‘Job’ resource shows if the task is completed; ‘ConfigMap’ resource shows ‘None’.
- Creation Time: The time when adding services.
-
Operations:
- Delete: Delete the added service.
- Edit: Edit the YAML file of the service.
Container Management
Clicks on the service name to enter the container details page, the page shows the information of container name, IP, status, duration, and host machine. If any container malfunctioned, you can recreate the container, the service would stop working until finishing recreating.
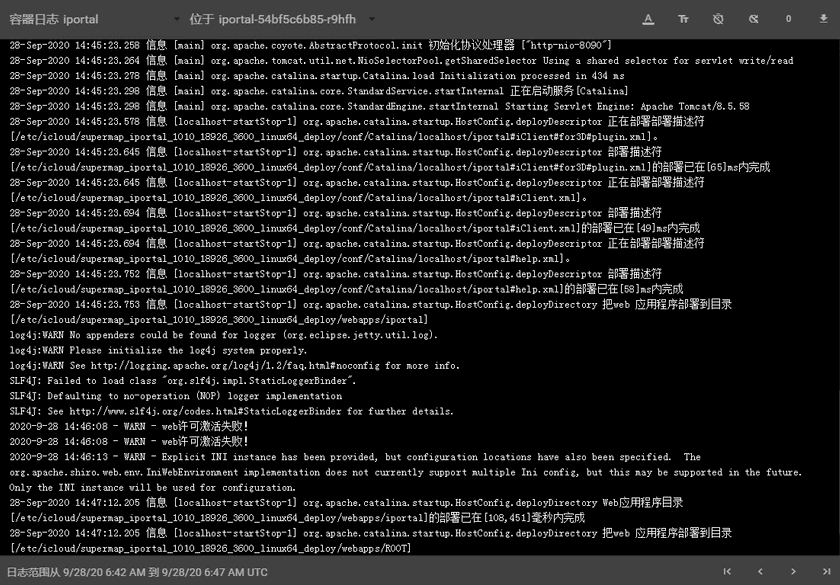
Clicks on Logs to enter the container log, the log records the running status and running history of the container.
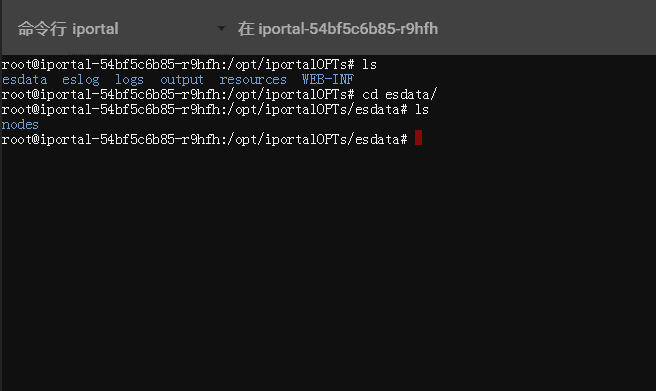
Clicks on Command Pad to control the container, administrator can execute commands in the interface to operate the container.
For example, executes ‘ls’ command to view the files in the directory.
Notes:
Using [shift + insert] to paste the commands into the Command Pad.
