Tutorial
Alibaba Cloud NAS Configuration
Please follow the steps to configure Alibaba Cloud NAS:
Create ServiceAccount
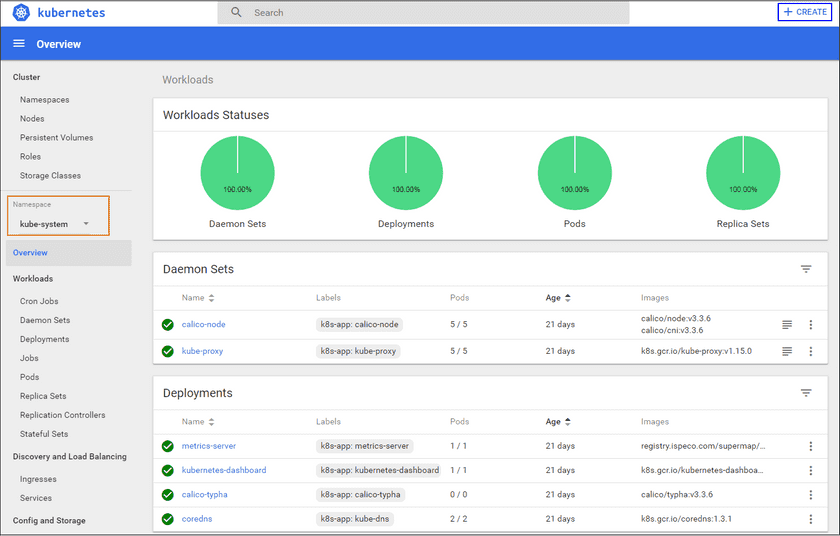
- Visit Kubernetes UI. The address is
http://IP:31234, replaceIPby the actual IP of Kubernetes master node. -
Selects Kube-system in the Namaspace, and click on CREATE on the right corner of the page.
-
Create YAML file(You an create from text input, or create from file). The content of YAML file is in below:
apiVersion: v1 kind: ServiceAccount metadata: labels: type: storage-class kind: imanager-base name: nas-client-controller --- kind: ClusterRoleBinding apiVersion: rbac.authorization.k8s.io/v1 metadata: labels: type: storage-class kind: imanager-base name: run-nfs-client-provisioner subjects: - kind: ServiceAccount name: nas-client-controller namespace: kube-system roleRef: kind: ClusterRole name: nfs-client-provisioner-runner apiGroup: rbac.authorization.k8s.io - Click on UPLOAD.
Install Nas Controller
- Repeat the steps 1-2 of Create ServiceAccount.
-
Create YAML file. The content of YAML file is in below:
kind: Deployment apiVersion: extensions/v1beta1 metadata: name: alicloud-nas-controller namespace: kube-system spec: strategy: type: Recreate template: metadata: labels: app: alicloud-nas-controller spec: tolerations: - operator: Exists affinity: nodeAffinity: preferredDuringSchedulingIgnoredDuringExecution: - weight: 1 preference: matchExpressions: - key: node-role.kubernetes.io/master operator: Exists priorityClassName: system-node-critical serviceAccount: nas-client-controller hostNetwork: true containers: - name: nfs-provisioner image: registry.cn-hangzhou.aliyuncs.com/acs/alicloud-nas-controller:v1.14.3.8-58bf821-aliyun env: - name: PROVISIONER_NAME value: alicloud/nas securityContext: privileged: true volumeMounts: - mountPath: /var/log name: log volumes: - hostPath: path: /var/log name: log - Click on UPLOAD.
Create StorageClass
GIS application and database need different StorageClass when binding a same NAS. If you change both GIS application and database to NAS storage, you need to create two StorageClass.
Create Database StorageClass
- Repeat the steps 1-2 of Create ServiceAccount.
-
Create YAML file. The content of YAML file is in below:
apiVersion: storage.k8s.io/v1 kind: StorageClass metadata: labels: kind: imanager-base name: alicloud-nas-database mountOptions: - nolock,tcp,noresvport - vers=3 parameters: server: "23a9649583-iaq37.cn-shenzhen.nas.aliyuncs.com:/nasroot1/" driver: flexvolume provisioner: alicloud/nas reclaimPolicy: Delete - Click on UPLOAD.
Create GIS Application StorageClass
- Repeat the steps 1-2 of Create ServiceAccount.
-
Create YAML file. The content of YAML file is in below:
apiVersion: storage.k8s.io/v1 kind: StorageClass metadata: labels: kind: imanager-base name: alicloud-nas-gisappset mountOptions: - nolock,tcp,noresvport - vers=3 parameters: server: "23a9649583-iaq37.cn-shenzhen.nas.aliyuncs.com:/nasroot1/" driver: flexvolume provisioner: alicloud/nas reclaimPolicy: Delete - Click on UPLOAD.

